

OK I am amazed by the speed and effort you have all gone too.
I am going to put up the images with attached details and links for you to review.
Click below to see loads!
and the last one
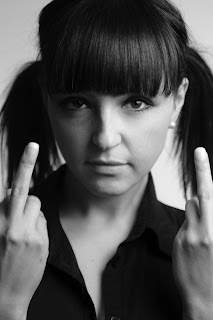
From Joshua Maurer

Hey Dom thanks for the chance to do this! Great photo to work with I felt silly editing a photo I don't have the ability yet to take :P
Big fan of the addition of this background from Chris Smith

Photoshop cs5.
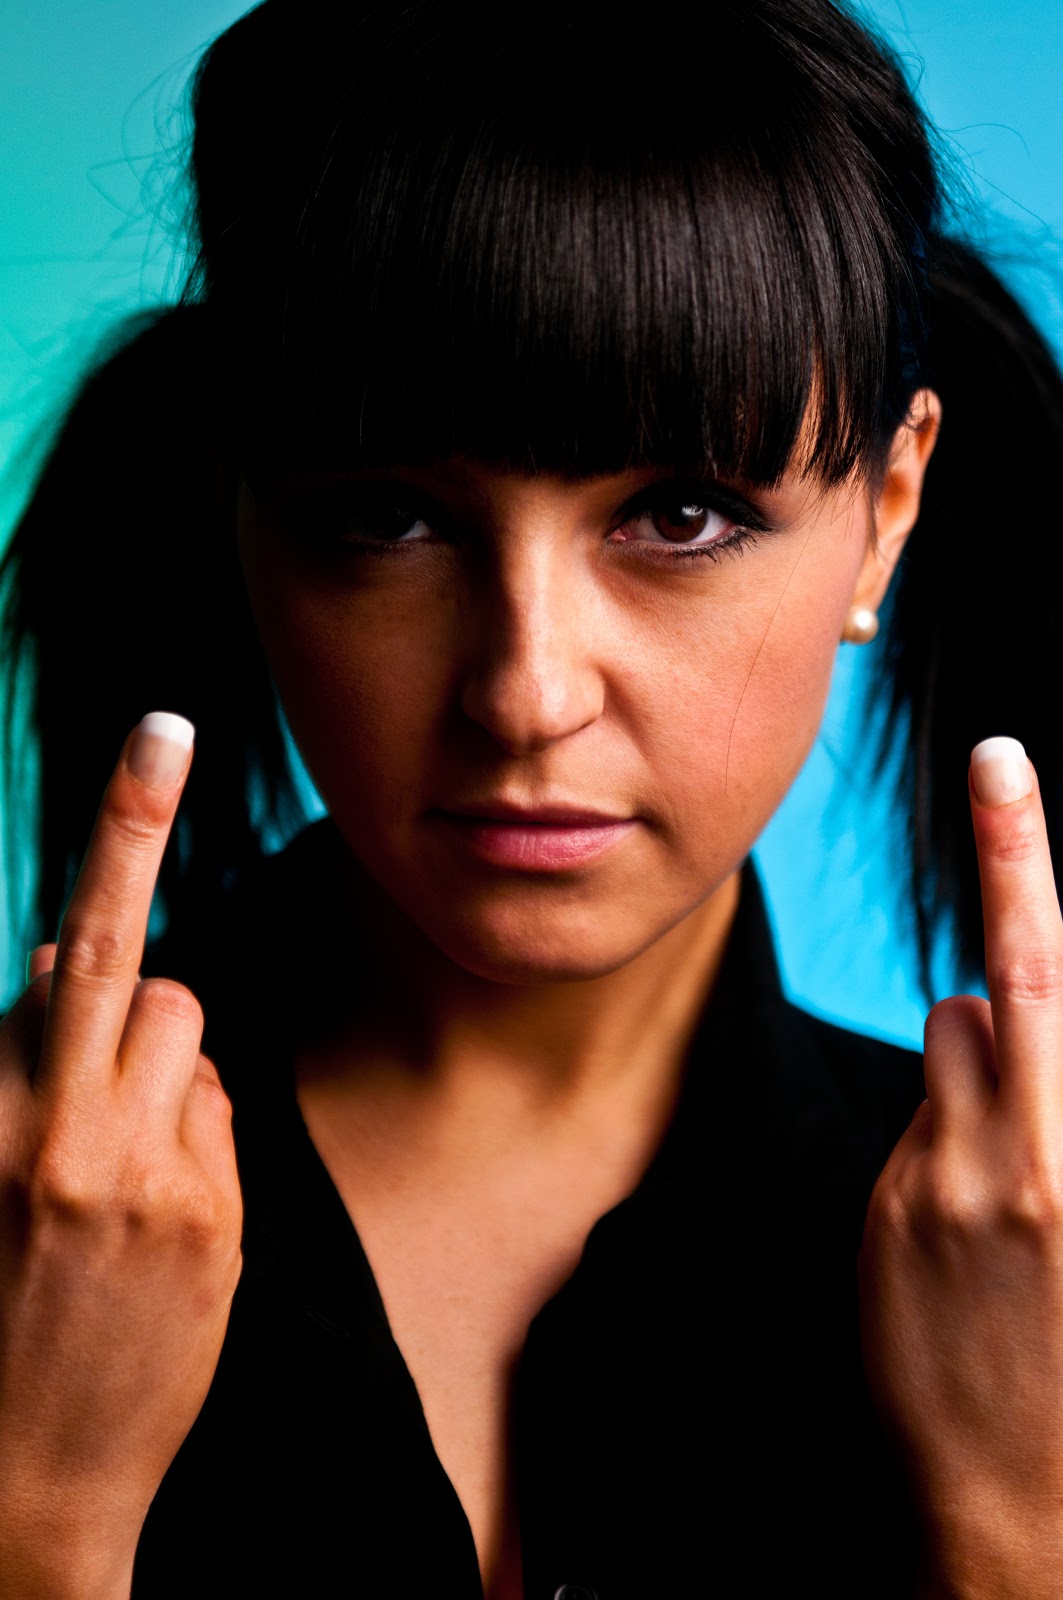
Thomas Clemens sent in this


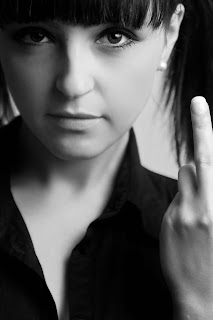
Zak Charles did this one

Hi, Dom
I gave this an attempt.
1. Cropped it
2. adjusted exposure, highlights and shadows.
3. more contrast and a bit more vibrancy.
4. lights and blacks. trial and error.
4. toned the skin, added lots more reds to bring out the shirt.
5. removed blemishes and used adjustment brush to soften skin.
6. slight vignette.
This is the basics of what I did.
Cheers
From John Appleby


Alreet there dom,
From John Holme


Hi Dom
I have edited the photo`s of Pamela Beck, the attached files are edited and corrected in CS5,
I do not believe in overdoing the PP work,
I find starting with the "auto" is best, Its a starting point, I then alter white balance, exposure, black, brightness, clarity and so on until I am happy with the histogram and the results.
Next I open the image in CS5 and checking the histogram I make adjustments in levels and curves, again watching the blacks and highlights for clipping.
the "healing brush" is used to remove blemishes on the skin and removal of fluff and dust etc, the clone tool was used to remove unwanted and distracting hair across her cheek.
I felt I had to crop both images for a better comp and punch in colour, I also as you can see reverted to a mono and tight crop to 4165 as the top of her head was chopped of anyway.
I was going to use Portrait Professional, but decided against it as I did not want to alter her to much.
Great work Dom keep it up.
John Holme
From Thomas Hollaender

From Howard Haigh

Hi Dom
Great idea! Here is my attempt and the procedure I used with Photoshop CS4 (image imported via Adobe Camera RAW but all changes made in PS).
I first converted the image to B&W, this is to help me judge the levels from black to white without the intrusion of colour. This is how we were recommended to adjust TV sets in the past (first get a good looking B&W picture, then bring the colour back in). I brought the highlights (rightmost) slider in to 225 and then saved the levels preset from the B&W version.
I then reverted to the original colour version and applied my levels preset.
I checked for any evidence of focus blur on the model's eye with a plugin filter called Focus Magic and applied a 2 pixel out-of-focus recovery to sharpen the image.
I then ran PictureCode Noise Ninja filter to remove any pre-existing noise or artefacts created by the previous sharpening step.
I often like to do some shadow recovery so using Shadows/Highlights I decided on 25% shadow recovery and also 5% highlight recovery.
I then applied a subtle rectangular dark vignette to the image using Tiffen Dfx filter plugin to emphasise the model's face.
I then decided to clone out the distracting long stray hair. My attitude with 'blemishes' like these is that if a MUA/Hair Stylist had been able to deal with a stray hair or skin blemish at the time of the shoot then it's fair game to do the same with Photoshop.
Best wishes
Howard Haigh
From Safauna Adam


one in PS (Can't quite remember all I did, but this is the basics that I remember)
"Fuck You"
-Adjusted Exposure
-Created a duplicate and used Unsharpen Mask set at 100%, 4.4 pixels, 10 levels. Created a mask out of said layer, blacked out, and coloured in hair and eyes for added detail. Flattened image.
-Softened skin using Gaussian Blur at 21.4 pixels (duplicated layer, masked, painted over skin avoiding details like eyes, lips, nose, etc.)
-Brightness/Contrast as high as possible (150 and 100), and switch to softlight. Adjusted opacity (not sure what number).
-Colour balance to get rid of orangy tones.
-fill layer with pale yellow adjusted to overlay
-fill layer with pale blue adjusted to lighten
-white fill gradient on right hand side of image, opacity adjusted to taste.
-Liquify on nose and knuckles/fingers
-Dodge over highlights in hair
Red Shirt
-Created a duplicate and used Unsharpen Mask set at 100%, 4.4 pixels, 10 levels. Created a mask out of said layer, blacked out, and coloured in hair and eyes and pearls for added detail.
-Softened skin using Gaussian Blur at 21.4 pixels (duplicated layer, masked, painted over skin avoiding details like eyes, lips, nose, etc.)
-Brightness/Contrast as high as possible (150 and 100), and switch to softlight. Adjusted opacity (not sure what number).
-Colour balance to get rid of orangy tones.
-fill layer with pale blue adjusted to overlay
-fill layer with pale purple adjusted to lighten
-white fill gradient on left hand side of image, opacity adjusted to taste.
-Liquify on nose
-Dodge over highlights in hair
Ryan sent in this one

From Joshua Maurer

Hey Dom thanks for the chance to do this! Great photo to work with I felt silly editing a photo I don't have the ability yet to take :P
Anyways I made a video and it's on youtube (sorry for shitty compression and stuff haven't used youtube in ages so I'm not with the HD times)
Software: Adobe LIGHTROOM3
Steps :
Camera Calibration - Portrait
Spot Removal Brush on various moles, blemishes and what nots
graduated filter to lighen the exposer on the left side of the photo
White Balance lowered, I tend prefer cooler color schemes
Upped the luminance of the Noise reduction +29 to smooth the skin a little bit
I played around with black levels and contrast a bit to see what kind of "improvements" I could get
Lowered Saturation a tiny bit, it fit the mood of the photo in my opinion
Added some vignetting...Confessed vignette whore here...
I played with the tone curve a bit to to make sure things were contrasting perfectly the way I wanted them
Lowered the Temperature a bit more to really make it feel cold
I finished it with a bit more Noise Reduction (cheap lazy way to smooth skin, but lose some detail)
Thanks again for this stuff Dom you should do more, it was fun!
Big fan of the addition of this background from Chris Smith

Photoshop cs5.
1. inserted background
2. smoothed skin
3. adjusted curves
Thanks for all your work Dom.
Christopher Smith
Thomas Clemens sent in this

Hi Dom,
it's a really nice idea to let us edit some of your files. Much fun and something to learn, too!
So here is my edit of _D0M3903.NEF
Well, obvious that it's photoshopped, but I hope you like it.
Kind regards
Thomas
First some minor edit in Lightroom.
Exported to TIFF and edited in PS CS4
Layers beginning at the bottom:
1. Make the whole image a little brighter
2. reduce reds and yellows of the skin
3. brighten some parts of the skin
4. darken some parts of the skin
5. some kind of powder effect
6. soften the image
7. little changes in saturation and brightness
8. sharpen
Zak Charles did this one

Hi, Dom
I gave this an attempt.
1. Cropped it
2. adjusted exposure, highlights and shadows.
3. more contrast and a bit more vibrancy.
4. lights and blacks. trial and error.
4. toned the skin, added lots more reds to bring out the shirt.
5. removed blemishes and used adjustment brush to soften skin.
6. slight vignette.
This is the basics of what I did.
Cheers
From John Appleby


Alreet there dom,
John from newcastle here, I think this is a great idea it's a shame I just found out about it... done 2 quick edits and recorded them too. hope you like the outcome.
I was in Edinburgh last weekend.. and took "this picture" on my phone from the castle its the solders dog grave yard !
John (aka ETSME on youtube
From John Holme


Hi Dom
I have edited the photo`s of Pamela Beck, the attached files are edited and corrected in CS5,
I do not believe in overdoing the PP work,
I find starting with the "auto" is best, Its a starting point, I then alter white balance, exposure, black, brightness, clarity and so on until I am happy with the histogram and the results.
Next I open the image in CS5 and checking the histogram I make adjustments in levels and curves, again watching the blacks and highlights for clipping.
the "healing brush" is used to remove blemishes on the skin and removal of fluff and dust etc, the clone tool was used to remove unwanted and distracting hair across her cheek.
I felt I had to crop both images for a better comp and punch in colour, I also as you can see reverted to a mono and tight crop to 4165 as the top of her head was chopped of anyway.
I was going to use Portrait Professional, but decided against it as I did not want to alter her to much.
Great work Dom keep it up.
John Holme
From Thomas Hollaender

Hi' there,
Here's my submission.
Major edits in Photoshop - and final adjustments in Lightroom.
I didn't record my edits - but here's what i remember:
· Remove spots, stray hairs and stuff in photoshop.
· Lighten left eye and cheek.
· Minor shaping using exposure layers
· Add a little extra highlight spots in the eyes
· Change color of eyes and lips
· ...and hair
· ...and nails
· Change the background to give the picture a little more 'manga' feel.
· Back in Lightroom for a little skin smoothening.
· Minor ajustments to contrast etc.
· A little vignetting
That's about it :-)
Love these kinds of challenges...
/ Thomas Hollænder
Denmark
From Howard Haigh

Hi Dom
Great idea! Here is my attempt and the procedure I used with Photoshop CS4 (image imported via Adobe Camera RAW but all changes made in PS).
I first converted the image to B&W, this is to help me judge the levels from black to white without the intrusion of colour. This is how we were recommended to adjust TV sets in the past (first get a good looking B&W picture, then bring the colour back in). I brought the highlights (rightmost) slider in to 225 and then saved the levels preset from the B&W version.
I then reverted to the original colour version and applied my levels preset.
I checked for any evidence of focus blur on the model's eye with a plugin filter called Focus Magic and applied a 2 pixel out-of-focus recovery to sharpen the image.
I then ran PictureCode Noise Ninja filter to remove any pre-existing noise or artefacts created by the previous sharpening step.
I often like to do some shadow recovery so using Shadows/Highlights I decided on 25% shadow recovery and also 5% highlight recovery.
I then applied a subtle rectangular dark vignette to the image using Tiffen Dfx filter plugin to emphasise the model's face.
I then decided to clone out the distracting long stray hair. My attitude with 'blemishes' like these is that if a MUA/Hair Stylist had been able to deal with a stray hair or skin blemish at the time of the shoot then it's fair game to do the same with Photoshop.
Best wishes
Howard Haigh
From Safauna Adam


one in PS (Can't quite remember all I did, but this is the basics that I remember)
"Fuck You"
-Adjusted Exposure
-Created a duplicate and used Unsharpen Mask set at 100%, 4.4 pixels, 10 levels. Created a mask out of said layer, blacked out, and coloured in hair and eyes for added detail. Flattened image.
-Softened skin using Gaussian Blur at 21.4 pixels (duplicated layer, masked, painted over skin avoiding details like eyes, lips, nose, etc.)
-Brightness/Contrast as high as possible (150 and 100), and switch to softlight. Adjusted opacity (not sure what number).
-Colour balance to get rid of orangy tones.
-fill layer with pale yellow adjusted to overlay
-fill layer with pale blue adjusted to lighten
-white fill gradient on right hand side of image, opacity adjusted to taste.
-Liquify on nose and knuckles/fingers
-Dodge over highlights in hair
Red Shirt
-Created a duplicate and used Unsharpen Mask set at 100%, 4.4 pixels, 10 levels. Created a mask out of said layer, blacked out, and coloured in hair and eyes and pearls for added detail.
-Softened skin using Gaussian Blur at 21.4 pixels (duplicated layer, masked, painted over skin avoiding details like eyes, lips, nose, etc.)
-Brightness/Contrast as high as possible (150 and 100), and switch to softlight. Adjusted opacity (not sure what number).
-Colour balance to get rid of orangy tones.
-fill layer with pale blue adjusted to overlay
-fill layer with pale purple adjusted to lighten
-white fill gradient on left hand side of image, opacity adjusted to taste.
-Liquify on nose
-Dodge over highlights in hair
Ryan sent in this one

Well like all my edits i go through all adjustment top to bottum making
slight changes so nearly everything is cahnged.
Main ones i guess are Cantrast Up, Vibrance Down a bit, Shadows Up and
White Balance Down so its colder.
I Used Lightroom.
TIMMY REALIZE Tantisrisuk
Sent in this one

stewart low
sent me this singe image

hi dom, love the pics, great idea. heres my attempt at fame. done with light room and photoshop. enjoy
regards stewart low
Sent in this one

I used photoshop CS5
First i use the Healing brush tool to removed the spot on her skin . After that i inserted filter " Surface blur " and layermask to selected part of the skin by setting of Radius 6 and Threshold 66. Then i selected her teeth and increase the brightness about 25. Finally i inserted curve and increased the saturation by +24.
stewart low
sent me this singe image

hi dom, love the pics, great idea. heres my attempt at fame. done with light room and photoshop. enjoy
regards stewart low
Natural light photographer sent me this

Hi Dom,
just found your edit challenge today so thought id give it a go. You've had some great edits sent to you. Hope you do a similar challenge again.
My Method:
1) i open straight to photoshop without going through any of the first RAW editing section.
I like to work with the default image.
2) What i call a defog, i sharpen image by 10% with a radius of 130 pixels and threshold 0.
3) using adjustment curve i darken the image slightly drawing out the darker areas to add mood to the image.
4) i noticed a few small blemishes under the chin and between the eyes that i quickly removed with spot removal tool.
5) Under her left eye was a very large dark section i didnt like. i duplicated the layer and changed the type to lighten. Selecting a lighter colour of skin next to the darker area i then pain over the top of the area i dont like. I then reduced the opacity to 40%.
6) Just noticed a scar on her right hand, removed with spot removal.
7) Spot removal also used to remove hair on left cheek.
8) Created a new layer to go through Skin softening using Gaussian Blur at 10 pixel radius. Then add a vector mask and fill with black, then pain over skin areas with white. Opacity then dropped to 60% to allow a little skin texture through.
9) Burn tool used at 5% on midtones, around the eye lashes just to enhance them slightly.
10) Dodge tool at 5% on highlights used one whites of eyes again just to enhance slightly.
11) crop done at slight angle just to be different.
12) A Vignette done around the sides to close the sides off and bring focus to centre of image. This was done by creating a border round the image at 200 pixels, feather at 200 pixels then layer via copy. Layer type is multiply.
Done
E.Nichole sent me these
Hello Mr. Bower! Just wanted to send off my edits to add to the bunch.. I used photoshop cs3 on all of the edits & I applied simple methods.. I attached 3 photos, all of which took me about 10 mins to do once I had the skin healed nicely .. I'm not a huge fan of heavy photoshop work so I only did very light edits to keep the look of the original photos & the natural beauty of the model.. Thanks for giving us all the chance to test our skills out!
Cheers!
-E.Nichole


Photo Information
To clean the skin:
Used the healing brush to fix the blemishes...
Used the pen tool to select skin & moved it to a new layer, them applied a surface blur with a radius of 16 & a threshold of 3
Applied a Gaussian blur with a radius of 1.1 & then lowered the opacity of the fixed skin layer to 85% to bring back a little bit of the texture
Created a new layer painted over her teeth (to whiten them a bit) in black & changed the blending mode to saturate, lowered the opacity to 43%.. Also applied a Gaussian blur with a radius of 1.4 pixels..
I also corrected the blue tones on the left side of her belt by making a new layer & painting over it white & changed the blending mode to saturation
1st Photo:
I applied 2 color fill layers (1 light blue & 1 darker blue) to give it a slight blue-ish tone
I adjusted the curves & levels & thats about it..
2nd photo:
Adjusted the hue & saturation to bring out the reds
Duplicated the layer & applied a gaussian blur & changed the blending mode to soft light..
Reduced the opacity to 90%
3rd Photo:
Dodged the background to complete white & desaturated the image
Added a shadow & highlights layer & adjusted those to fit the picture
Dupilicated the layer then used a curves adjustment layer to add to that
I then duplicated that layer & added a unsharp mask to bring out the neutrals more & make it pop
I also adjusted the brightness & contrast a bit & thats about it..
This was from an email that is named just as F M
oh ok thanks.. here are the files each with screenshots of what was done.

could not decide which of the _D0M3903-Edit1's to post so i gave you both, 1 and 1-2, feel free to use which ever one you like better, small differences. Sorry for the big file sizes... if you get irritated with this, please let me know and i will resend. I dont want you wasting your time waiting for these files to download. ha


All were edited in Lightroom, with small selective color adjustment in Photoshop CS3 to image: _D0M3903-Edit1-2.jpg
William Campbell (a man of few words has send in this shot

Hi Dom,
Sorry I was so late to get back to you. I was at work when you placed the message on my image :).
- William Campbell
James kuhn has sent in these shots


Hello Dom,
>
> I tried to keep it simple and not over do it.
>
> I looked at each picture to try and see what it was
> saying. To try and find and accentuate what it was
> evoking in me. Dom3903 almost instantly reminded me of a
> Disney Princess. So not knowing what the pic would be used
> for, I just went with that. There are two versions of
> Dom3903. I just made Dom 3903a the Disney type pic.
>
> I used Lightroom 3 and Photoshop. First was Lightroom.
> I used the adjustment brush and did the following; smoothed
> her skin, brightened the background, whitened her eyes and
> teeth only a wee bit.
>
> Then I raised the exposure, recovery, fill light and
> blacks. Reduced saturation but increased vibrance.
> And then I went and increased saturation in the reds and
> decreased luminance in the reds. Done with Dom 3903.
>
> Dom 3903a I opened up in Photoshop and made a
> duplicate layer. I used the color range tool to
> highlight the white back ground and remove it. I created a
> mask layer to be able to go around the edges to smooth and
> get rid of any white that may have been left. On the bottom
> layer I just used a grunge tool to add just a touch of color
> to the background. I just made it the same color as the
> shirt.
>
> I then just added a couple little birds to make it look
> playful and sort of Disney like.
>
> Dom4165 sort of just looked plain. I think you have to have
> both hands in the pic to get the feel of flipping someone
> off. It's more than just the finger, I think it's body
> posture as well, that helps send the message.
>
> I did not want to smooth anything. I wanted her to look
> like she had a rough night and someone asked her to cook
> some breakfast.
> In Lightroom I lowered the temp and tent. Raised exposure
> +.04, Fill light +100, blacks 66, brightnes +21 and contrast
> +1.
> In the presence section I went +5 on clarity, +18 on
> vibrance and -79 on saturation. +17 highlights, +17
> lights and +9 shadows.
> Sharpening I went to 115 @ a radius of 1.6 and detail at
> 25.
> And a tad of lens vignetting and highlight priority. And
> sent it to Photoshop.
> I used a blur tool to blur the pic except for the eyes. I
> wanted to be drawn to the eyes first and then to the hands
> and fingers. I also pixalated the fingers to maybe add
> to the atittude and message she was sending.
>
> Thanks for taking the time to share your information with
> us,
> Jimmy Kuhn
Here we have a submittion from 2b4d photography

youtube/cthibodeaux81
1. i used lightroom 3
2. bumped up the exposure to blowout the background
3. used an adjustment brush and lowered the exposure back down only on the model.
4. spot removal on her chin
the end
ps: keep up the good work.
Here is Andrew Cruttenden
Hi Mr Dom


First of all thankyou for your e-mails and utube advice on opening a flickr account in response to my question a few weeks ago. I have since opened an account and have made new contacts and joined a few groups.
Im sure some people will spend hours editing the sample photos, showing off their skills and software..........i have chosen a simple approach and added the same basic adjustments to both photos so anyone can try this in aperture3, photoshop ,gimp , lightroom or any software that allows you to adjust curves............however first of all on the headshot i cloned out the long stray hair that was on the lit side of her face......... on the girl in red shot i cloned out the loose clump of hairs on her shoulder...........
For the curves adjustments........first make a small s curve on the red channel......... then a small s curve on the green channel.........lastly make a small reverse s curve on the blue channel.
then increase the overall temperature to about 7000k, to warm it up a bit............All done
This can be saved as a preset in Aperture and im sure lightroom will save it as a preset if you are using that program
Its simple ,quick and gives a subtle warm vintage type look that is seen in womens magazines and clothes shops at the moment.
Cheers Dom...
Andrew Cruttenden
Hi Dom,
Russell Durrant
Thanks for giving us the opportunity to edit some of your images, I hope you feel I have done them justice. I will list only the settings I have adjusted, all other settings will be at their default.
Image _DOM3903.

Basic Settings:-
White Balance: Temp 5950
Tint +12
Exposure: +0.69
Recovery 24
Fill Light 9
Blacks 6
Contrast: +60
Clarity: +22
Vibrance: +15
Saturation: 0
Detail:
Sharpening Amount: 62
Radius: 2.0
Camera Calibration Settings:
Profile: Camera Portrait.
I used the spot removal tool to remove the slight blemishes from the face and arm.
Image _DOM4165
After experimenting for a while with this image, I felt black & white was the way to go with this one.
Basic Settings:
White Balance:
Temp: 3724
Tint: -5
Exposure: +6.0
Fill Light: 20
Blacks: 3
Contrast: 74
Clarity: -10
Black & White Mix Settings:
Red: -1
Orange: -2
Yellow: -34
Green: -26
Aqua: -17
Blue: -11
Purple: +17
Magenta: +7
Detail Settings:
Sharpening Amount: 50
Detail: 29
Camera Calibration:-
Profile: Camera Portrait.
I used the exposure brush twice to reduce the dark patch under the models right eye. Settings used:
First pass:-
Exposure: 0.39
Saturation: -100
Clarity: -100
Second Pass:-
Exposure: 0.20
Saturation: -7
Clarity: –73
Thanks again Dom.
Regards,
Russell Durrant.
Next we have Raymond Nilsen


Thanks for giving us the opportunity to edit some of your images, I hope you feel I have done them justice. I will list only the settings I have adjusted, all other settings will be at their default.
Image _DOM3903.

Basic Settings:-
White Balance: Temp 5950
Tint +12
Exposure: +0.69
Recovery 24
Fill Light 9
Blacks 6
Contrast: +60
Clarity: +22
Vibrance: +15
Saturation: 0
Detail:
Sharpening Amount: 62
Radius: 2.0
Camera Calibration Settings:
Profile: Camera Portrait.
I used the spot removal tool to remove the slight blemishes from the face and arm.
Image _DOM4165

After experimenting for a while with this image, I felt black & white was the way to go with this one.
Basic Settings:
White Balance:
Temp: 3724
Tint: -5
Exposure: +6.0
Fill Light: 20
Blacks: 3
Contrast: 74
Clarity: -10
Black & White Mix Settings:
Red: -1
Orange: -2
Yellow: -34
Green: -26
Aqua: -17
Blue: -11
Purple: +17
Magenta: +7
Detail Settings:
Sharpening Amount: 50
Detail: 29
Camera Calibration:-
Profile: Camera Portrait.
I used the exposure brush twice to reduce the dark patch under the models right eye. Settings used:
First pass:-
Exposure: 0.39
Saturation: -100
Clarity: -100
Second Pass:-
Exposure: 0.20
Saturation: -7
Clarity: –73
Thanks again Dom.
Regards,
Russell Durrant.
Next we have Raymond Nilsen
Here is 3 edits of the first photo of Pamela Beck

Edit 1:
I slightly bumped up the contrast a little bit to a +30 Value
Added some clarity for the midtones to a +64 Value
Enhanced the colors with a vibrance to a +20 Value and Saturation to a –10 Value
On the luminance slider for the colors, i decreased the luminance with a –11 Vlaue
Sharpening
Amount: 25
Radius: 2.0
Detail: 30
Masking: 0
Effects
Highlight Priority: –5
----------------------------------------

Edit2:
I first increased the exposure to a +0,97 value then bumped up the contrast to +75 and Brightness to +50
Added some clarity to +20 and Saturation to +20
Detail
Sharpening Amount: 43
Radius: 1,2
Detail: 25
Masking: 0
Noise Reduction: 22
Detail: 50
Contrast: 0
Effects
Highlight Priority: –24
-----------------------------------------------

Edit3:
Exposure increased with +0.33 added brightness with +45 and contrast with +73. Then i hit the recovery slider to 20 and filled blacks with 50 and Fill light with 40
Then i added some clarity to +20, vibrance to +40 and decreased saturation with –70
Detail
Sharpening Amount: 25
Radius: 3
Detail: 30
Masking: 0
Noise Reduction
Luminance: 22
Detail: 50
Effects
Highlight Priority: –24
Midpoint: 50
Feather: 50
Thanks for having this oppertunity, sorry for my bad english and looking for more photos to edit 
This photo was my fav! Keep it up Dom!
Next we have Chris Scott

Since it was late it was just a quickie...
Opened thru camera raw, brightened image to my tastes
cropped
new layer - levels adjustments
new layer - colour balance
new layer - healing brush to get rid of blemishes
liquified background to straighten nose slightly
created two flattened copies of image as new layers:
layer a - high pass 3 pixels, overlay blend mode; mask to only affect eyes and 50% opacity around nose
layer b - high pass 9 pixels, invert and overlay; mask to affect skin on face and next, avoiding lips
created two flattened copies of image as new layers:
layer c - convert to bw using hig contract red filter; mask to avoid lips and eyeballs, opacity 65%
layer d - convert to bw using blue filter; mask variously to get rid of most of the blue & green background
Next we have Keith Jackson
Hey Dom, great idea allowing us the chance to edit your photos! I think its a fun addition to the channel and blog!

Ok so here is what I did on the photos using Light Room 3:

3903:
changed the WB to 5500
decreased exposure by -0.20
increased contrast to 39
increased clarity to 25
vibrance to 7
fill to 15, I was trying to get some detail on the models right shoulder...
recovery to 6
many small spot removals
painted around eyes with +0.20 exp and -39 clarity.
increased blacks to 6
adjusted tone curve.
4165:
increased blacks to 9
increased exposure +0.45
clarity to 66
vibrance to 39
painted with negative clarity around eyes
spot removals
tone curve

Ok I added fill to this one, and toned down the orange... late night, in a dark room LOL

increased fill
took down brightness
and exposure to +0.25
Next we have Jason Clavey
Hey Dom,
I thought I would jump on the bandwagon, and just do 2 quick edits.
4am isnt my most creative time of the day, so I just did basic edits, nothing fancy.
 photo 4165:
this is what I would class as a standard photoshop editing routine for me.
firstly I set the levels to which I was happy with, , with a better exposure and clarity.
I took out the big stray hair that was crossing the face on the right. with very fine spot removal.
then I removed any other slight blemishes on the face with the same tool.
then I did a bit of skin processing, with some very opaic cloning, dodging and burning.
Pam has great skin so there wasnt much processing needed at all, if any. but I still did it to show what I would normally do.
next I gave a bit of pop to her eye, as one eye was extremely under exposed, I didnt want to give too much pop to her well exposed eye as it would look stupid.
firstly I used the dodge tool and brightened up the white of the eye, and then the desaturation sponge to keep it naturally white looking, then I enhanced the iris by dodging it, and adding a slight bit of saturation.
I then used the selective colour adjustment, and enhanced the background, by taking away the yellow and green tones from it and saturating the cyan more.
finishing off with a very low density cooling filter. and some cropping
photo 4165:
this is what I would class as a standard photoshop editing routine for me.
firstly I set the levels to which I was happy with, , with a better exposure and clarity.
I took out the big stray hair that was crossing the face on the right. with very fine spot removal.
then I removed any other slight blemishes on the face with the same tool.
then I did a bit of skin processing, with some very opaic cloning, dodging and burning.
Pam has great skin so there wasnt much processing needed at all, if any. but I still did it to show what I would normally do.
next I gave a bit of pop to her eye, as one eye was extremely under exposed, I didnt want to give too much pop to her well exposed eye as it would look stupid.
firstly I used the dodge tool and brightened up the white of the eye, and then the desaturation sponge to keep it naturally white looking, then I enhanced the iris by dodging it, and adding a slight bit of saturation.
I then used the selective colour adjustment, and enhanced the background, by taking away the yellow and green tones from it and saturating the cyan more.
finishing off with a very low density cooling filter. and some cropping

Photo 3903:
this photo was a very simple edit,
using photoshop's great B&W converstion tool, I got the levels as I wanted them, added a little contrast,
and then using the layer mask, I proceeded to mask the image so that only the red of the shirt was saturated.
then enhancing the red with vibrance and selective colour.
2 very basic edits. hope you approve.
cheers
Jason
Now we have Antony Lopez
p late and i figured what the hell, might as well get in the this.
 _DOM4165
ACR 4.6
- WB set using tip of fingernail
- exposure -.20
- fill light 100
- blacks 20
- clarity 75
- vibrancy -25
CS3
- dodge and burn shadows and highlights at 5% opacity
- filter / sharpen / unsharp mask @ 60
1.0
0
- filter / noise / reduce noise
-- strength 9
-- preserve details 10%
-- reduce color noise25%
-- sharpen details 25%
-- remove jpg artifact
_DOM4165
ACR 4.6
- WB set using tip of fingernail
- exposure -.20
- fill light 100
- blacks 20
- clarity 75
- vibrancy -25
CS3
- dodge and burn shadows and highlights at 5% opacity
- filter / sharpen / unsharp mask @ 60
1.0
0
- filter / noise / reduce noise
-- strength 9
-- preserve details 10%
-- reduce color noise25%
-- sharpen details 25%
-- remove jpg artifact
 _DOM3903
ACR 4.6
- WB/ flash
- exposure -.35
- fill light 82
- blacks 35
- contrast 38
- clarity 70
- vibrancy 35
CS3
- quick selection on background / brightened background with a curve adjustment
- dodged and burned highlights and shadow areas at 5% opasity
- filter / sharpen
- filter / noise / reduce noise
-- strength 9
-- preserve details 10%
-- reduce color noise 25%
-- sharpen details 25%
-- remove jpg artifact
thanks this was fun, hope mine are at least okay?
_DOM3903
ACR 4.6
- WB/ flash
- exposure -.35
- fill light 82
- blacks 35
- contrast 38
- clarity 70
- vibrancy 35
CS3
- quick selection on background / brightened background with a curve adjustment
- dodged and burned highlights and shadow areas at 5% opasity
- filter / sharpen
- filter / noise / reduce noise
-- strength 9
-- preserve details 10%
-- reduce color noise 25%
-- sharpen details 25%
-- remove jpg artifact
thanks this was fun, hope mine are at least okay?
Anthony Lopez
Now we have Suman (Sam) Halder


Here're my edits with the screen shots so you can see my changes. I use Adobe Lightroom. I hope you like it. I've sent you a request in msn live messenger. My MSN is suman.baban@hotmail.com

 NOw we have Tim Park
Hey Mr. Dom,
I think this is a really great idea! (although I'm not sure I'd want to have to sort through the volume of emails you're going to get!)
I've had a go at editing both your shots and I did it all in Lightroom, not sure if this is what you mean by describing what you did but here goes:
NOw we have Tim Park
Hey Mr. Dom,
I think this is a really great idea! (although I'm not sure I'd want to have to sort through the volume of emails you're going to get!)
I've had a go at editing both your shots and I did it all in Lightroom, not sure if this is what you mean by describing what you did but here goes:
 D0M3903
Something about her pose or clothes made me think 'retro' (maybe the holding the collar up) in this shot so that's the sort of look I've gone for.
What I did:
Bumped up the exposure very slightly (+0.23)
Highlight recovery (6)
Upped the blacks slightly (3)
Increased vibrance (+20)
Tone curve adjustments: Highlights +24, Lights +13, Darks -21
Increased saturation of Red (+27), Orange (+5)
Increased luminance of Orange (+11), Yellow (+9). Decreased red (-2)
Split toning: Hue 83, Saturation 53
Adjustments brush to whiten teeth (exposure 0.41, saturation -63)
Adjustments brush to soften skin (clarity -100, sharpness 25)
Spot removal on couple blemishes
White balance changed to 5793 K
Tint -2
Slight vignetting added (-8)
D0M3903
Something about her pose or clothes made me think 'retro' (maybe the holding the collar up) in this shot so that's the sort of look I've gone for.
What I did:
Bumped up the exposure very slightly (+0.23)
Highlight recovery (6)
Upped the blacks slightly (3)
Increased vibrance (+20)
Tone curve adjustments: Highlights +24, Lights +13, Darks -21
Increased saturation of Red (+27), Orange (+5)
Increased luminance of Orange (+11), Yellow (+9). Decreased red (-2)
Split toning: Hue 83, Saturation 53
Adjustments brush to whiten teeth (exposure 0.41, saturation -63)
Adjustments brush to soften skin (clarity -100, sharpness 25)
Spot removal on couple blemishes
White balance changed to 5793 K
Tint -2
Slight vignetting added (-8)
 D0M4165
Went for a slightly desaturated look with a white background here.
What I did:
Spot removal to take out hair across the model's face and any blemishes on the skin
Increased exposure a little (+0.60)
Highlight recovery (9)
Fill light (8)
Tone curve adjustments: Highlights +60, Lights +6, Darks -11
Increased luminance of Red (+11), Orange (+14)
Upped blacks (7)
Decreased vibrance (-56)
Increased luminance of aqua and blue to +100 and decreased saturation to -100 to remove blue background
Used exposure brush to remove distracting hairs around model's head
Adjustment brush to enhance eyes
White balanced reduced to 3550 K
Tint -5
Thanks for all your videos Dom, they've been a real help!
Fhew thats a lot so far, oh wait thats only half the emails….
ok here we keep on going
Jay sent me this one (kinda vampirey)
D0M4165
Went for a slightly desaturated look with a white background here.
What I did:
Spot removal to take out hair across the model's face and any blemishes on the skin
Increased exposure a little (+0.60)
Highlight recovery (9)
Fill light (8)
Tone curve adjustments: Highlights +60, Lights +6, Darks -11
Increased luminance of Red (+11), Orange (+14)
Upped blacks (7)
Decreased vibrance (-56)
Increased luminance of aqua and blue to +100 and decreased saturation to -100 to remove blue background
Used exposure brush to remove distracting hairs around model's head
Adjustment brush to enhance eyes
White balanced reduced to 3550 K
Tint -5
Thanks for all your videos Dom, they've been a real help!
Fhew thats a lot so far, oh wait thats only half the emails….
ok here we keep on going
Jay sent me this one (kinda vampirey)
 Piotr Kuc sent me this
Hi Mr Dom!
I'm sending you photos for "edit chellange".
 Information about edit parameters:
_D0M3903.jpg:
I. Camera RAW: TEMP:2952 TINT: -2 EXPOSURE: +0.4 FILL LIGHT: 10 BLACKS: 5 CLARITY +29 VIBRANCE +17 SATURATION -14 II. Photoshop SILVER EFEX PRO BW FILTER SKIN SOFTEN + EYE SHARPNESS
D0M4165.jpg:
I. Camera RAW: TEMP:4900 TINT: +2 EXPOSURE: +0.35 BLACKS: 5 CONTRAST: +19 CLARITY +30 II. Photoshop SILVER EFEX PRO BW FILTER:"UNDEREXPOSURE EV -1"
Best regards!
Information about edit parameters:
_D0M3903.jpg:
I. Camera RAW: TEMP:2952 TINT: -2 EXPOSURE: +0.4 FILL LIGHT: 10 BLACKS: 5 CLARITY +29 VIBRANCE +17 SATURATION -14 II. Photoshop SILVER EFEX PRO BW FILTER SKIN SOFTEN + EYE SHARPNESS
D0M4165.jpg:
I. Camera RAW: TEMP:4900 TINT: +2 EXPOSURE: +0.35 BLACKS: 5 CONTRAST: +19 CLARITY +30 II. Photoshop SILVER EFEX PRO BW FILTER:"UNDEREXPOSURE EV -1"
Best regards!
Nicholas Erwin sent me this
Hey Dom,
I attached my edit of 4165.
 I started off by converting the photo to b/w in Adobe Lightroom, then set a custom white balance (Temp -3458, Tint -150) then after this step I changed the recovery to 100, blacks to 5. I also changed the brightness to +69 and contrast to +71.
After that I changed the tone curve just a little to get me a medium contrast.
Then, I messed around with the black and white mix, such as like the reds, orange, yellow, green, blue, etc to almost get like a infrared type look.
Then, I changed the sharpening setting from 25 to 45.
Finally, I used the brush tool (burn) to darken up the right side of her face because it got a little over exposed from the edits and just decided to burn it a little to bring back her face and I think it came out really good.
I think the black and white is very appropriate, almost giving a grunge type look. I went with this look because of her expression and her giving the middle fingers. In my opinion makes it looks pretty bad ass. haha.
Thanks Dom, for letting me edit your awesome photo!
Tommy Dobson gives me this
I started off by converting the photo to b/w in Adobe Lightroom, then set a custom white balance (Temp -3458, Tint -150) then after this step I changed the recovery to 100, blacks to 5. I also changed the brightness to +69 and contrast to +71.
After that I changed the tone curve just a little to get me a medium contrast.
Then, I messed around with the black and white mix, such as like the reds, orange, yellow, green, blue, etc to almost get like a infrared type look.
Then, I changed the sharpening setting from 25 to 45.
Finally, I used the brush tool (burn) to darken up the right side of her face because it got a little over exposed from the edits and just decided to burn it a little to bring back her face and I think it came out really good.
I think the black and white is very appropriate, almost giving a grunge type look. I went with this look because of her expression and her giving the middle fingers. In my opinion makes it looks pretty bad ass. haha.
Thanks Dom, for letting me edit your awesome photo!
Tommy Dobson gives me this
 First stage of editing:
Used Lightroom 3:
Converted the photo to B&W
Increased the fill light to roughly 86 and the blacks to 50ish
Increased the contrast slightly too
Exported the photo
Then reset the photo so it was back to the original
Increased the contrast slightly and the clarity
Increased the vibrance a little bit too
Exported the photo
Second stage:
Used CS5:
Opened the colour version
Placed the B&W on top of it
Created a layer mask on the B&W photo and rubbed in the colour
Tommy Dobson
Christian Moller gives me this
 Here is my go at editing the lovely Pamela Beck.
I have done the following using Light Room 3:
- Adjusted the exposure,
- dodged the blacked out arias to bring out more detail,
- softened the skin
- Iris enhanced the eyes
- dodged the eye whites
- saturated the mouth
- sharpened the face line
- sharpened the lashes
- doged the face to soften the shadows
Regards
James Christian Moller
Now here is an exciting one!
Hi Mr. Dom,
I am Rolando V. Tugade Jr. originally from the Philippines but I am working here in North Wales at the moment. This is my editing versions (colored black&white) of your lovely photo.
I made a video of how I edited it as well and will be uploaded in youtube.
Here's the link of the video tutorial:
http://www.youtube.com/watch?v=5lzoBCXiHy4

 Thanks.
Regards,
Rolly :)
I like the red one a lot!
Jaymzp sent me another one Which i think he may have got an idea from amanda Diaz on my facebook
Thanks.
Regards,
Rolly :)
I like the red one a lot!
Jaymzp sent me another one Which i think he may have got an idea from amanda Diaz on my facebook
 Jeffrey Dose sent me this
 Hey Dom, I took a very simple approach to this edit. Personally, I like the simplicity of this image. The frame is filled with a model (Pamela) who is sending a clear message to the viewer... I did not want my editing to detract from that. Opened the file first in Picasa: 1. Bumped up the highlights 2. Bumped up the shadows slightly 3. I removed various areas of distraction, such as a cut/blemish on her wrist, chest, and nose. I also removed a few wisps of hair, namely the one hanging in front of her face (I did this with the retouching tool). 4. I converted the image to black and white. I then opened the image in Gimp: 1. Added a slight vignette 2. Very slightly dodged her eyes Nice shot and nice model. I really appreciate the hard work you put into the tutorials! Thanks for the project! -Jeff Dose
and there are a load more on the facebook page c Cezary Korpal sent me a psd file which I then had to change to Jpeg for you to see he writes
Hey Dom, I took a very simple approach to this edit. Personally, I like the simplicity of this image. The frame is filled with a model (Pamela) who is sending a clear message to the viewer... I did not want my editing to detract from that. Opened the file first in Picasa: 1. Bumped up the highlights 2. Bumped up the shadows slightly 3. I removed various areas of distraction, such as a cut/blemish on her wrist, chest, and nose. I also removed a few wisps of hair, namely the one hanging in front of her face (I did this with the retouching tool). 4. I converted the image to black and white. I then opened the image in Gimp: 1. Added a slight vignette 2. Very slightly dodged her eyes Nice shot and nice model. I really appreciate the hard work you put into the tutorials! Thanks for the project! -Jeff Dose
and there are a load more on the facebook page c Cezary Korpal sent me a psd file which I then had to change to Jpeg for you to see he writes
ok so what i done -clean the skin -make correction on her nose - eye's -change blend mode -add small amount of fill light -saturated the background -remove flying hairs -correction on red tone -add contrast -add light in her hair add sharpness to her eye's i think is most thing which i remember, is not great but that i was doing in around hour, i hope you like it. aa and i add a psd file so actually you can turn on and off one layer to see all difference i love doing that:-)
 then the edit

 Next up we have james Pardon
Hi Dom,
Love the idea of this. I actually think it'd be great to do this sort of thing on a larger scale with 'pro-editors' running through submissions, as you get with BTS vids.
Here's mine anyhoo!
Next up we have james Pardon
Hi Dom,
Love the idea of this. I actually think it'd be great to do this sort of thing on a larger scale with 'pro-editors' running through submissions, as you get with BTS vids.
Here's mine anyhoo!
 _D0M3903_JAP
- Removed some stray hairs with the healing brush in Photoshop
- Used Liquify to straighten up the nose a bit and small amount on teeth
- Used spot tool to remove blemishes.
- Used brush tool to smooth over skin
- Used the brush tool in Lightroom to bump exposure in some areas. (face + her right shoulder)
- Adjusted the contrast on shirt and arms.
- Adjusted sliders in the Basic section of Lightroom :

Next one
 _D0M4165-235-237_JAP
- In Lightroom used the gradient tool set to exposure and used horizontally across face to lighten left side. I like this tool because it's easy to adjust after you've placed it. Posistion & strength
- In photoshop used the patch tool to reduce the mouth and eye lines.
- Created a new catchlight with shape tool
- Removed some 'grey hairs' Probably just the light hitting a few hairs.
- Used the liquify tool to bump out the left side of her hair to match the right. Straightened nose a bit.
- Brightened the eyes (probably a bit too much but for me it's the key interest in the photo
- Plumped lips every so slightly with liquify
- Adjusted the background with the hue grabber thing in Lightroom
Cheers Dom!
James
Now we have Alex Finlay

 Hey Dom, nice images! Hope you like my edits, nothing major just colour change really Alex Finlay IMAGE ONE Camera Raw: -colour balance and tint change -Contrast boost - Clarity reduce - Fill light boost PS: - Curve adjustment, boost blues shadows and reduce highlights, red curve highlight boost - levels to get nice exposure - dodge eye - warming photo filter - remove stray hair across face IMAGE TWO Camera Raw -Contrast boost -crop to make central - warm image up - fill light boost - adjustment brush contrast on her skirt PS: - Curve adjustment, boost blues shadows and reduce highlights, red curve highlight boost - levels to get nice exposure
Here is one I am excited in getting
From the amazing photographer Amanda Diaz over in Canada
Hey Dom, nice images! Hope you like my edits, nothing major just colour change really Alex Finlay IMAGE ONE Camera Raw: -colour balance and tint change -Contrast boost - Clarity reduce - Fill light boost PS: - Curve adjustment, boost blues shadows and reduce highlights, red curve highlight boost - levels to get nice exposure - dodge eye - warming photo filter - remove stray hair across face IMAGE TWO Camera Raw -Contrast boost -crop to make central - warm image up - fill light boost - adjustment brush contrast on her skirt PS: - Curve adjustment, boost blues shadows and reduce highlights, red curve highlight boost - levels to get nice exposure
Here is one I am excited in getting
From the amazing photographer Amanda Diaz over in Canada
 Heres mine. I 1st fixed the shadows on her face (nose and under eyes) and lightened the left side of her face to even it out. Cleaned up the hair. Messed around with the curves and color balance and added some "lighting" and did a tiny bit of liquification :)
check out her site amandadiaz.com
Moritz winkler sends me this one
Heres mine. I 1st fixed the shadows on her face (nose and under eyes) and lightened the left side of her face to even it out. Cleaned up the hair. Messed around with the curves and color balance and added some "lighting" and did a tiny bit of liquification :)
check out her site amandadiaz.com
Moritz winkler sends me this one
 Hi Dom,
here is my version of your photo. (already posted on facebook)
Hi Dom,
here is my version of your photo. (already posted on facebook)


Nice edits all of them :) Well done everyone!
ReplyDeleteI would say that was a roaring success!
ReplyDeleteWow! Lots of awesome edits! I love seeing everyone's taste, everyone is just so unique!
ReplyDeleteDom, are you going to do more of these?
it is a shed load of work. will do though, as it is very interesting to see the results
ReplyDeleteThat was nice! The variety of styles here is really cool, too. Goes to show how important and significant post editing can be, especially when the raw-material is great. :)
ReplyDeleteI really like Chris Scott edit.
ReplyDeletethe video one was well cool like that guys style too :)
ReplyDeleteI'm really liking James Pardon's spin on image 3903, currently. As Mr. Polin would say, he made it go BOOM. Nicely done, sir.
ReplyDeleteAwesome idea Dom, its really informative seeing different's photographers in post processing work.
ReplyDeleteChris Scotts is my fave, just a great job
In my edit of Image _DOM4165 the exposure setting should be +0.6 not +6.0, that was a typo in my email, sorry Dom.
ReplyDelete