
Ok which photo do you like more?
A

Or B

B is ok, its not that bad, but for a property company A is what is requested.
Click the read more to see what extra is done to get the shot.

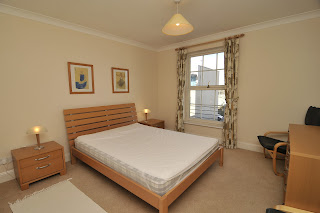
The shot above is what the best the camera did in auto mode with High D-lighting and a positive 1-ev compensation:
Here is how it started out:


A

Or B

B is ok, its not that bad, but for a property company A is what is requested.
Click the read more to see what extra is done to get the shot.
Video at the bottom
The shot above is what the best the camera did in auto mode with High D-lighting and a positive 1-ev compensation:
Here is how it started out:

All photos taken with the Tokina 11-16mm lens (check link at bottom) @ iso 200
This was the very first shot of the room. The angle is ok but the room is dark, the window is totally blown out, there is crap in the corner. First lets start metering. And tidying

First off, move the extra bedding off the chair at the side, and meter for that area in the dark part, it was giving me an f2.8 but it really needed to be brighter than that. The brightness from the window was screwing things up for the cameras metering.

Next spot meter for what the brightness for outside is. In this shot it was f8, i set the camera in manual as I knew I was going to be using flash so I set it to its fastest flash sync speed of 1/250th of a second. This setting is pretty hard core, you can see how black that makes the room and makes you realise how much the flash is going to have to explode to brighten up the place.

Stick the flash on, and point it up to bounce of the ceiling. Do not attach the Soften omni bounce or flash card that will really ruin everything
The best suggestion is to stick the aperture somewhere below but not too far from F8, I went one stop down to f5.6, the outside should still be visible but it is a lot less power that the flash will have to pump out, here was the first shot with the camera on a matrix metering.

The next stage is to put the camera into Spot metering. Although the shutterspeed and aperture are not changing on the camera as it is set in manual the camera will increase the blast from the flash to make the part that you are metering to a more relevant brightness, here i spot meter off the dark part of the chair, this instantly brightens up the room and adds texture to the darker areas where you didn't previously see.
But is looking a little cold.

To fix that without spazing up the white balance i just turn on the lights, and tidy up some of their cables so they are not all over the place

Then the last tip is to add in one stop of exposure compensation. This again as it is not changing the camera settings will force the flash to blast off that bit harder (now very glad I am not shooting at f8 with my little sb900 )
)
Now i have a well exposed internal image of a room, where it looks nice and warm and inviting and also you get to see what is out of the window so it is not blown out.
The lense that is used for these photos and for all my property photos
n this shot video i explain and demonstrate why not to use a dome difuser if you are doing any sort of interior architecture photography. it casts shadows!!! and that goes for any gay ary fong diffusers as well!
out of curiosity, what makes you like photo 'B' better?
ReplyDeletethanks
A
ReplyDeleteA is definitely better. The warmt because the lights are on, the bed doesn't look crimpled and teh distracting pillows are removed from the chair. Additionally the lower viewing position brings the ceiling in which forms a nive V leading viewers into the bed. So if I was trying to market a room I'd definitely go with A
ReplyDeleteWhich Nikon camera are you using for these shots?
ReplyDeleteD300 obviously
ReplyDeleteHi Dom, Thanks for the wonderful summarised version on how to shoot interiors - I think anything which allows "joe" public take better pictures is fantastic. I studied for 3 yrs at Uni (Degree in Photography) to learn this. ha ha ha Well, showing my age as YouTube wasn't around then oh neither was digital cameras !!!!
ReplyDelete